wax
Moderator: ToddMichael
-
Colin Creed

- Senior Miller
- Posts: 819
- Joined: Tue Jul 20, 2004 2:57 am
- Location: Berwick, Victoria, Australia
- Contact:
wax
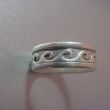
here's one more from the "weave" tut I posted and a way to use it with the "flow to surface" command
- Attachments
-
- wv ring.jpg (18.33 KiB) Viewed 8219 times
-
- DSCN2759.jpg (54.59 KiB) Viewed 8219 times
-
jeff dunnington

- Site Admin
- Posts: 1622
- Joined: Tue Feb 24, 2004 1:24 pm
- Location: Houston, Tx
- Contact:
Your experiments with rhino are really proving to be useful for jewelry.
You are welcome to post the same here in our Rhino forum.
Pat other than milling speed and 1 pass milling, are you getting any better results milling them on your MDX40 than you can get with the MDX15?
I have defanltly notice a difference in surface finish on models that were designed with Rhino vs 3dengrave.
Keep up the good work!!!!
wax
hey jeff... can't really answer that ..I just used the 15 for these pieces right now because it was already setup I had to do several passes.. and no ball burr.. so I just used one of my harbor freight bits and set it up as a ball burr I was in a rush to see the results so there are "tool" marks on the surface ...not unnormal suff....
wax
here's a couple I worked on last night...
invisible sets I would never make one but here's one
also I don't like how poeple design their "bead work" all the time so I made one more "traditional" looking bead setting sample you diamond setters should apreciate the sample
invisible sets I would never make one but here's one
also I don't like how poeple design their "bead work" all the time so I made one more "traditional" looking bead setting sample you diamond setters should apreciate the sample
- Attachments
-
- brtcts2.jpg (35.44 KiB) Viewed 8199 times
-
- brite cuts.jpg (24.15 KiB) Viewed 8199 times
-
- invsbl sets.jpg (23.12 KiB) Viewed 8199 times
wax
here's a test piece to check my new " traditional bead set" cutter I made ...the mill was not set up right so the test piece is actually lower into the wax then it should be by (1.6mm) ... you can kinda see the 45 degree bright cut going down the edge in the picture diamond setters how's that look!!! (wax could be cleaner just an experiment)
- Attachments
-
- DSCN2763.JPG (53.71 KiB) Viewed 8114 times
-
- DSCN2760.JPG (56.34 KiB) Viewed 8114 times
wax
I make my own stone cutters and keep them in my virtual "toolbox"and use as needed I can scale them up or down for anysize stone needed .... I import one and copy and place as many as needed for the job when there all set in place all I do is bouleon difference and everything is there including the stone! then just delete the stone for milling I have a nice selection to pick from for my many needs ...this one was made to copy "traditional"bead setting with the bright cut diamond shape seperating the stones
I made this cutter because I don't like how everyone just does the prongs only it's the diamond shape and bright cutting that makes up real bead setting so I tried to copy the effect ..not bad I must say!!!
I made this cutter because I don't like how everyone just does the prongs only it's the diamond shape and bright cutting that makes up real bead setting so I tried to copy the effect ..not bad I must say!!!
-
jeff dunnington
- Site Admin
- Posts: 1622
- Joined: Tue Feb 24, 2004 1:24 pm
- Location: Houston, Tx
- Contact:
wax
thank you jeff even though I don't do much milling for customers, as a matter of fact people don't even know what I can do, I'm too busy with other stuff to promote myself but I'm always thinking, experimenting and trying to figure out how to do what I can do buy hand on the computer..the stone cutter tool took me along time to figure out, it still was not what I wanted but it came out fine in the end